White card stock
Eagle head stamp by Rubber Monger
Gold pigment ink pad
Black pigment ink pad
Watercolor pencils-sky blue, yellow and light brown
1 small square double stick mounting tape(found in hardware and art supply stores
Glue
2 skeins embroidery thread-1 in gold and one in sky blue
A feather (optional)

Directions
Cut the sheet of buff colored (or calligraphy paper) into a 10" x 7" piece. Fold it in half to create a 5" x 7" card.
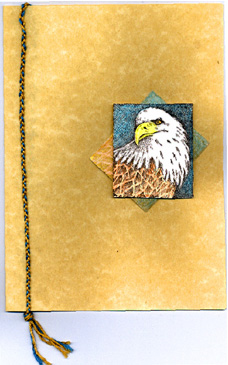
On the white card stock, stamp the eagle head twice-once in gold and once in black. Cut away the excess paper, leaving only the stamped image.
Once the ink is dry, color in the image. On both stamped pieces, the feathers should be brown, the background is blue and the eagle's beak is yellow. The difference in the ink used to stamp the images will cause a slight difference in the appearance of the final product-you do not need to change pencil colors to achieve this effect.
Cut a small square of mounting tape. Apply it to the center front (over the image) of the eagle that you stamped with the gold ink. Peel off the protective paper and place the remaining eagle head over the tape at an angle as shown in the sample. Then glue the finished product onto the center of the buff colored card (position as shown).
Cut two pieces of gold embroidery thread approximately three times the length of the card. Do not separate the threads-use them just as they come off the skein. Cut one piece of blue the same length. Braid the threads into one long piece.
Wrap the braided thread over the card and knot it at the end. Cut off the excess thread to create a tassle.
OPTIONAL: Glue a small feather (real or stamped) to the top of the braid.
 Main
Page
Main
Page